Roof repair is one of the home repairs that most homeowners can do themselves. Depending on the type of damage and your physical ability, you can replace missing shingles or seal leaks around chimneys, vents, and skylights.
Start by getting into the attic or crawl space and inspecting rafters and joists for damp spots. Then find the leak source.
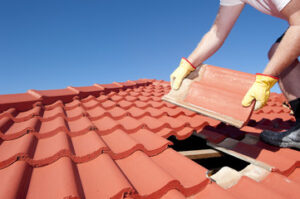
Damaged shingles can allow water to seep under the roof, causing serious leaks and possibly staining the interior of your home. If you spot any damaged shingles, be sure to replace them as soon as possible. Depending on the location and severity of the damage, you may have to remove entire rows of shingles in order to repair the problem. In this case, you will need to prepare a ladder and have someone help secure it to the roof before you start climbing.
To fix a damaged shingle, first loosen the nails and adhesive holding it in place with a pry bar or hammer claw. Loosen the shingle directly above it, as well, and pry up both of them. This will expose the nail strip underneath, making it easier to pull up the old shingle. Use the pry bar to break the black, self-sealing adhesive and lift the shingle. Remove the old shingle and inspect the area around it for other shingles that need replacing. If you have trouble finding a replacement shingle to match, consider face nailing the new one (i.e. putting it so the nail isn’t exposed to the elements).
Cracked shingles are harder to repair than simply missing ones, but this issue should still be dealt with as soon as possible to prevent water from entering your home. The cracks can occur from high winds, temperature changes, or from the shingles drying out over time, and can often appear as dark spots on your roof. In some cases, cracked shingles will also cause paint streaks in your home’s ceiling or walls.
To repair a cracked shingle, first apply a small amount of shingle cement under the edges of the tabs. Then, carefully press a fresh shingle over the cracked area and spread more sealant over it with your putty knife. If you’d like, you can camouflage the repair by collecting granules from your gutter and sprinkle them over the wet sealant. Check the shingle a day later to make sure it has sealed properly. If not, repeat the process.
Leaking Gutters
Leaky gutters can cause all sorts of problems for your home, from rotting fascia boards and soffits to water damage in the ceiling and walls. It is important to check gutters regularly for clogs and leaks, especially in the winter when they can become ice-bound and sag. Inspecting the joints and seams is one of the easiest ways to identify a gutter problem.
Over time, even the sturdiest gutters can develop small cracks and leaks, usually at the seams. These can be caused by the wear and tear of abrasion or by expansion and contraction in the weather. These minor leaks can sometimes be patched with caulking or waterproof tape, but if you are concerned about the integrity of your gutters it is best to replace them.
Another common cause of leaky gutters is a loose gutter hanger. These are often fastened to the gutters using nails or screws and can become loose for a variety of reasons. When this happens, the gutter can separate from the roof fascia board and allow water to leak into the home. Loose gutter hangers can be repaired by nailing or screwing them back in place or by replacing them altogether.
Gutter problems are a lot easier to repair when they are caught early. The first sign of a leaky gutter is standing water or signs of moisture around the windows, doors, and trim of your home. You should also look for puddles in the yard or erosion of the landscaping surrounding your home. If you find a definite problem area with your gutters, such as a leaking end cap or downspout, it is generally best to contact a professional to determine if the problem is with the gutters themselves or the roof.
You can often repair a leaky gutter by simply resealing the joint with caulking or waterproof tape. Before you start, it is a good idea to take the time to remove any debris from the gutters and then clean the area thoroughly. This will help prevent the new sealant or tape from being contaminated by dirt particles that can make it less effective. Lastly, make sure to exercise caution when working on high or challenging areas of your gutter system.
Damaged Flashings
Flashings are the thin metal pieces that line roof valleys and prevent leaks around chimneys, skylights, vents, and dormers. Although tough, they can deteriorate from harsh weather conditions like high winds, heavy rains, and salt air in coastal areas. Flashing problems are usually minor, but they can develop into major roofing challenges if left untreated.
Often, a small hole in the flashing is all it takes to let water seep under shingles. This can cause wood rot and mold in attics and rooms below the affected area of the roof. It can also damage and weaken gutters, causing them to clog or overflow.
If a flashing is damaged, it should be repaired as soon as possible to prevent further issues. Inspect the area for signs of leaks or water damage, including damp ceilings, stains on walls and ceilings, and damp attics. Look for shingles that are bending and darkening, especially those closest to the flashing. If a flashing has been installed incorrectly, you may also see moss and mold growing on fascia boards or wood trim in the area of the affected roof section.
The most common flashing issue is that it becomes loose or pulls away from the roof. This can happen when the screws that anchor it to the roof deck become loosened or stripped, or from corrosion caused by salt air and extreme heat. In some cases, the nails that hold it in place begin to pull out.
A reliable commercial roofer will inspect the flashings when they perform a roof repair or replacement. If they notice that a flashing is missing, they will create a plan for repairing it without disturbing the roof. It is important to use the same flashing type and technique as the original flashing, as this will prevent leaks.
A roofer can repair a hole in the flashing by first roughening the surrounding surface with sandpaper or a wire brush to make it more accepting of a patch. Then, the patch should be cut slightly larger than the hole and affixed to the flashing using a waterproof roofing cement. Once the patch is in place, cover it with extra roofing cement as an extra layer of protection against moisture.
Damaged Soffit
Often overlooked by homeowners, the soffit is one of the most important components of a sloped roof. As a “skin” that covers your roof’s eaves, it serves a vital purpose: It allows for attic ventilation and prevents water damage to the interior of the house by keeping moisture out of the attic.
As with shingles and flashings, your soffit can be affected by moisture and rot. This can lead to serious problems that can impact the rest of your home’s structure. If you notice your soffit has become damaged, it is essential that you repair it immediately to avoid further issues.
One of the easiest ways to tell if your soffit is damaged is by observing signs of moisture damage. Look for wood rot, which is generally identifiable by brown spots or a soft, crumbling texture. Mold and fungus can also be obvious indicators that your soffit is damaged.
In addition to allowing water into your attic, a rotting or damaged soffit can create a space for insects to nest in and cause more damage to your roof and home. Insect infestations can be very difficult to get rid of, and you will need to call pest control as soon as possible to address the issue.
The most common cause of soffit damage is water damage, which can occur when water seeps through worn shingles or loose flashings and lands on the soffit board. This can lead to rot, which is a significant problem and can spread to the rafters or roof boards.
To repair a soffit that is damaged or rotted, start by removing the shingle molding, which is the narrow piece of wood that runs along the edge of your shingles. This can be removed with a pry bar, but it is important to be careful not to damage the fascia or roof shingles beneath it. If the shingle mold is in good condition, it can be reused later.
Next, remove the soffit boards, which are located in the eaves above your shingles. This may be a bit tricky, since the drip edge (metal flashing along the top of your eaves) will need to be removed in order to get to the soffit. Once the soffit boards are removed, you will need to replace them with new ones. Make sure you use plywood and apply a sealant to the sides and edges to help protect them from moisture damage.